
FAQ RESTOREPIC.COM
FAQ
FAQ – What is photo restoration and what can we do?
FAQ – Photo restoration is the process of repairing and enhancing old, damaged, or faded photographs to restore their original appearance. This process typically involves:
- Fixing Damage – Repairing tears, scratches, stains, and other physical damage.
- Color Correction – Restoring faded colors or converting black-and-white photos into color.
- Sharpening & Enhancing Details – Improving clarity, contrast, and sharpness.
- Removing Unwanted Elements – Eliminating dust, spots, or other imperfections.
- Reconstructing Missing Parts – Filling in missing sections of a photo using digital tools or AI.
Photo restoration is done using specialized software like Photoshop, AI-based tools, or even manual touch-ups. It’s often used to preserve historical photographs, family heirlooms, or sentimental images.
How is photo restoration done ?
Photo restoration is done using a combination of digital tools and techniques to repair and enhance old or damaged images. Here’s a step-by-step breakdown of the process:
1. Scanning the Image
- If the photo is physical, it needs to be scanned at a high resolution (600–1200 DPI) to capture all details.
- Scanning in color mode (even for black-and-white photos) helps preserve more details.
2. Cleaning the Image Digitally
- Remove dust, scratches, and stains using software like Adobe Photoshop, GIMP, or AI-based tools.
- Tools like Spot Healing Brush, Clone Stamp, and Patch Tool are used to fix imperfections.
3. Repairing Physical Damage
- Tears and missing sections are reconstructed using content-aware fill, AI tools, or manual retouching.
- If parts of the image are missing, an artist might recreate them by referencing similar areas or using AI-powered restoration.
4. Restoring Color and Contrast
- If the image is faded or discolored, adjustments to brightness, contrast, and levels are made.
- Colorization (adding color to black-and-white photos) can be done using AI or manual painting techniques.
5. Sharpening and Enhancing Details
- Filters like Unsharp Mask or High-Pass Filter help improve sharpness.
- AI-powered tools can enhance facial features or refine textures.
6. Removing Noise and Artifacts
- Old photos often have grain or digital noise after scanning. Noise reduction tools smooth out the image while keeping details intact.
7. Final Touch-ups and Exporting
- The restored image is checked for accuracy and realism.
- The final version is saved in high-quality formats (TIFF, PNG, or JPEG) for printing or digital use.
Where can be done ?
Photo restoration can be done in various places, depending on the method and expertise required:
1. At Home (DIY Method)
- Individuals can restore photos using software like Adobe Photoshop, GIMP, or AI-based tools (e.g., Remini, MyHeritage).
- Many online AI-powered tools offer quick, automated restoration with decent results.
2. Professional Photo Restoration Services
- Local Photo Studios & Print Shops – Many photography studios offer restoration services.
- Specialized Restoration Companies – Some businesses focus solely on restoring old or damaged photos.
- Freelancers & Online Services – Websites like Fiverr, Upwork, and Etsy have skilled professionals who can restore photos.
3. Museums & Archives
- Historical institutions and museums use advanced techniques to restore and preserve old photographs.
- Governments and universities often have restoration experts working to maintain archival images.
Why photo restoration is done ?
Photo restoration is done to preserve, repair, and enhance old or damaged photographs for various reasons, including:
1. Preserving Memories
- Many old photos hold sentimental value, capturing family history, special moments, or loved ones who have passed away.
- Restoration helps protect these memories from fading, discoloration, or physical damage.
2. Repairing Damage
- Over time, photos can suffer from scratches, tears, water damage, mold, or fading due to exposure to light, humidity, or improper storage.
- Restoration reverses these effects, making the image look new again.
3. Enhancing Historical & Cultural Records
- Museums, libraries, and historians restore old photographs to preserve historical records for future generations.
- It helps keep history alive by making old images clear and accessible.
4. Digital Preservation & Sharing
- Once restored, photos can be digitized and backed up, ensuring they are never lost.
- Digital versions make it easy to share with family members or reprint copies.
5. Colorizing & Modernizing
- Some people restore photos to add color to black-and-white images, making them more lifelike.
- This can give a new perspective on historical photos or personal memories.
Restoration and retouching services – what we can do – FAQ
FAQ - Can you add or remove people to a photo ?
Yes, we can add or remove people in the photo but it will not be a very easy job. It all depends on the quality of the images you have, framing, brightness and more. Even if the images were recorded one after the other they may not be the same in terms of brightness, contrast.
Can you color or recolor a picture ?
We can color or recolor an image and we try to make it as realistic as possible.
What kind of damage can be restored ?
- Missing fragments
- Scratches and cuts
- Folds, cracks
- Creases, tears
- Ink, paint, or drink stains
- Water and fire damage
- Flaked
- Light leakage
- Faded colors
- Tape marks
over-exposed or under-exposed
Just send the image and you will get as soon as possible FREE assessment to evaluate what’s possible and what’s not. Send here
How it works ,ordering & payment-FAQ
How it works ?
How much will it cost ?
You can buy from our shop or to get a free, with no obligation quote you can scan with a scanner or phone and upload your photos to site using this form here
How long will it take ?
Restoring images from digital files takes a minimum of 72 hours, and the restored image will be sent to you via email as soon as payment for the invoice is received.
How do I order ?
Upload a high-quality scan via the website form, together with a description of the issues you would like me to repair. After careful examination of your image, you will be emailed a quote. Once you have accepted the quote, we will get to work or use the shop
What payment options do you accept ?
We accept secure online payments via PayPal, Credit/Debit Card, Apple Pay, Google Pay
PayPal is one of the world’s leading and most secure online payment platforms and is very simple to use. Just click the link in the invoice e-mail you received from us and follow the instructions provided – not need a PayPal account to pay.
Can I review my restored photo before I pay ?
Once your photo has been restored, an email with a low resolution watermark will be sent for your approval. If you are happy with the result, I will send you an invoice and payment instructions.
If the payment is made in advance through our shop you can have as many revisions as you want.
I need an urgent restoration/retouch, can you help ?
For Fast Orders there is an extra charge of $15. Fast orders are processed within 12- 24 hours. Maximum of 2 images per order.
FAQ – How to Digitize Old Photos ?
Digitizing old photos is a great way to preserve memories and make them easily shareable. Here’s how you can do it:
1. Prepares old photos for scanning
Prepare Your Photos
- Gently clean the photos using a microfiber cloth to remove dust.
- If photos are curled, flatten them under a heavy book for a day or two.
- Organize photos by date, event, or category for easy access.
2. Choose a Digitization Method
a) Use a Flatbed Scanner (Best Quality)
- Recommended for high-quality scans.
- Set the scanner resolution to 300-600 DPI for standard photos.
- Scan in TIFF format for high-quality preservation or JPEG for easy sharing.
b) Use a Photo Scanner
- Devices like Epson FastFoto or Kodak Slide N Scan are specialized for photo scanning.
- Faster than a flatbed scanner and often includes software for restoration.
c) Use a Smartphone App (Quick & Easy)
- Apps like Google PhotoScan, Adobe Scan, or Microsoft Lens can digitize photos with decent quality.
- Ensure good lighting and avoid glare while scanning.
d) Use a Professional Service
- If you have a large collection, services like ScanMyPhotos or Legacybox can do bulk scanning.
e). Save & Organize Digitized Photos
- Save files in JPEG (for sharing) or TIFF/PNG (for archival quality).
- Organize photos into folders by year or event.
- Use metadata (date, names, locations) for easier searching.
f). Backup Your Digital Photos
- Store copies on Google Photos, iCloud, Dropbox, or an external hard drive.
- Consider a USB flash drive or Blu-ray disc for physical backups.
FAQ – Digitize Quick & Easy
If you want a quick and easy way to digitize old photos without complicated setups, here are your best options:
1. With a Smartphone Scanning App (Fastest & Easiest)
Instead of using a scanner, you can use your phone’s camera and a scanning app. These apps enhance quality, remove glare, and crop automatically:
- Google PhotoScan (Free, Android & iOS) – Removes glare and enhances old photos.
- Adobe Scan (Free, Android & iOS) – Auto-detects edges and improves sharpness.
- Microsoft Lens (Free, Android & iOS) – Great for batch scanning.
✅ How to Scan with a Smartphone App:
- Place the photo on a flat, well-lit surface.
- Open the app and follow on-screen instructions.
- Adjust the edges and save in high resolution.
- Store in Google Photos, iCloud, or on a USB drive for safekeeping, or send them to us for restoration.
It is preferable to take photos without flash in natural light and the photo should not contain shadows or excessive light.
You can even take photos with your phone’s camera in auto mode without flash. The photo must fill the phone screen. Take several perpendicular photos and send the photo that came out best (no shadows, excessive light and clear)
You can get the sharing link from Google Photos, Adobe Scan or Microsoft Lens and send it to us via email or the form on the website.
2. Use an Automatic Photo Scanner (If You Have Many Photos)
If you have a lot of photos, a fast-feed scanner is much quicker than scanning one by one.
- Epson FastFoto FF-680W – Scans hundreds of photos quickly.
- Kodak Scanza – Great for digitizing slides and negatives.
- Fujitsu ScanSnap iX1600 – Fast and reliable for bulk scanning.
✅ How to Use:
- Load multiple photos into the scanner.
- Press start and let it scan automatically.
- Store them digitally on your computer or cloud.
3. Use a Professional Scanning Service (Easiest, but Costs Money)
If you have hundreds of old photos and don’t want to do the work yourself, a scanning service can do it for you.
- ScanMyPhotos (Fast & Affordable)
- Legacybox (Includes restoration)
- Costco or Walmart Photo Services
✅ How It Works:
- Ship your photos to the service.
- They scan, restore, and send them back digitally.
- Download your digitized collection.
Final Tips for Quick & Easy Scanning
✔️ Use natural light or a ring light for better quality.
✔️ Store scanned photos in Google Photos, iCloud, or an external hard drive.
✔️ Rename files and organize by year, event, or person for easy searching.
FAQ – Restorepic.com
Pricing Restore old photos Service, Professional photo restoration and editing services with modern tools and techniques. Manually retouched using Adobe programs
FAQ – Upload photos to File transfer services.It’s easy and fast.
Send photo to restore – Due to the upload speed and file size, I recommend using transfer services which are much faster, more convenient and secure.
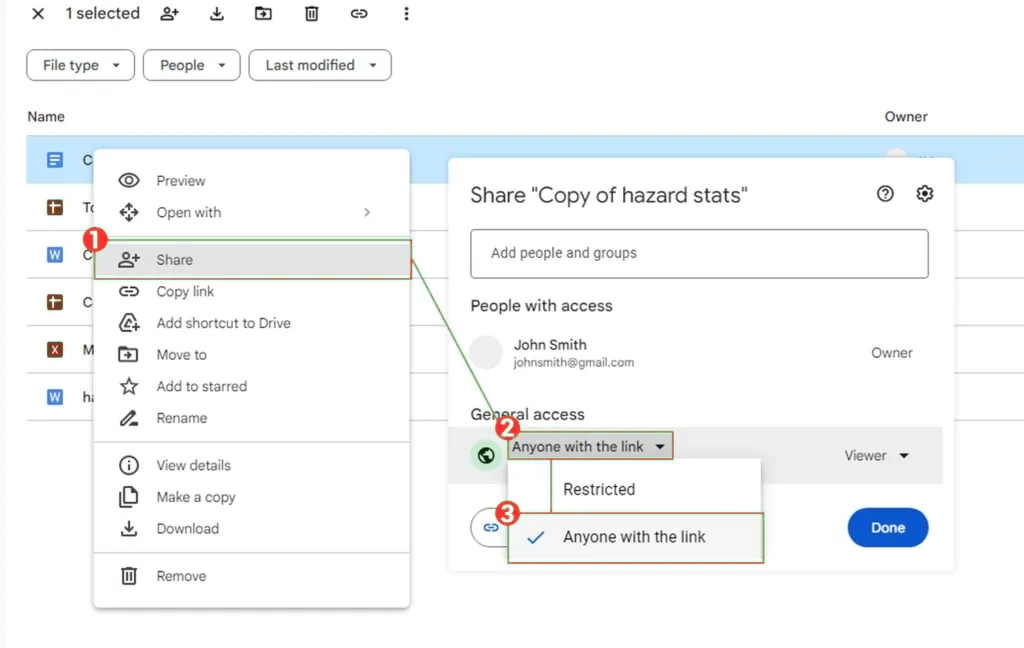
Get the share link from Google Drive
- Sign into your Google Drive account. You’ll want to do this through the web platform at drive.google.com for the easiest time in managing your files.
- Decide on the file, files, or folder you want to share
- Select the file, files, or folder, and right-click it.
- and select “anyone with the link.”
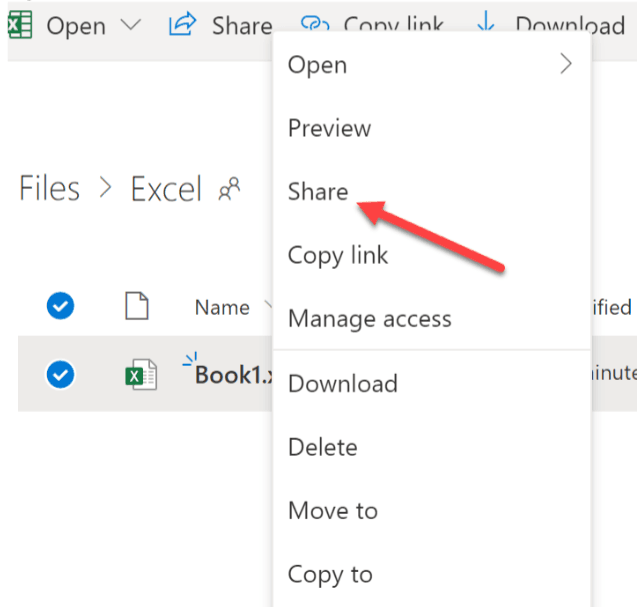
Share files with OneDrive
You can generate sharing links through the OneDrive web or desktop app for Windows 7, Windows 10, Windows 11, and Mac. Just right-click the file or folder in your OneDrive folder on your computer and select Share a OneDrive link. This will copy a link to your clipboard that you can paste wherever you want to send it.
Upload the file to www.transfernow.net
On homepage, you will find file transfer tool
Click on the “Start” button and select your files and start filling out the form with your information.
![]()
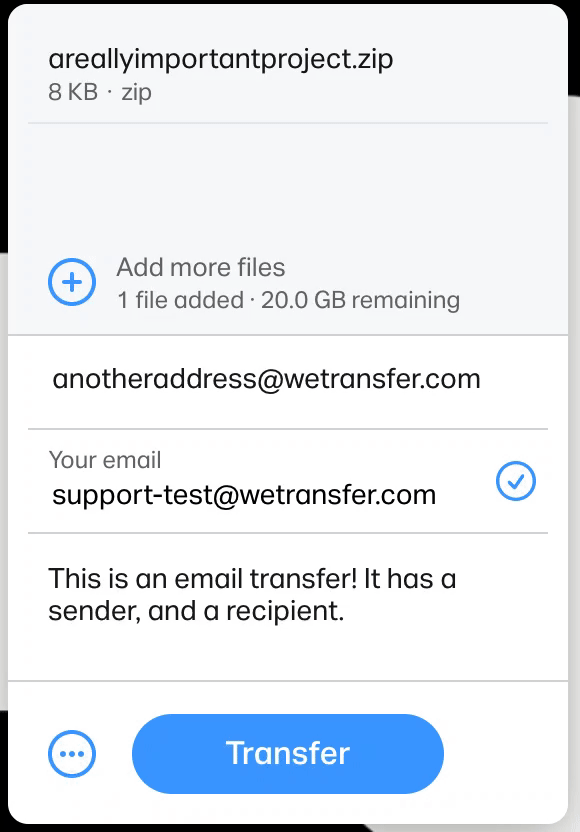
Upload file to www.WeTransfer.com
www.WeTransfer.com Just click on the ellipsis symbol “(…)” to reveal the email/link transfer switch. After adding files, click on the ‘Transfer’ button to generate a link.
Upload file to www.transferxl.com
Go to https://www.transferxl.com/
- click add files
- click Create transfer link
- click Transfer and get the link
FAQ – Restorepic.com
Pricing Restore old photos Service, Professional photo restoration and editing services with modern tools and techniques. Manually retouched using Adobe programs
